How to Build a Golf Simulator at Home
A home golf simulator lets you practice, play, and improve your game without needing to pack up and head to the course. While a full setup can be a major investment, you don’t need to spend tens of thousands of dollars to get started. PGA TOUR Superstore offers options designed to fit every budget, ranging from a simple launch monitor, mat, and net to a fully immersive system with an enclosure, impact screen, and advanced shot tracking.
If you’ve been thinking about building your own golf simulator at home, this guide will help you find the right setup based on your space and budget, plus offer tips on where to invest more for the best fit or how to play the latest simulator technology before you buy.
Not sure where to start? Take our Golf Simulator Quiz.
Everything You Need to Know About Setting Up Your Own Golf Simulator
Before you start shopping, keep these basics in mind:
- Consider your space, budget, and goals before choosing equipment.
- A launch monitor is the foundation of your simulator and is one of the most important pieces of your setup.
- An enclosure, impact screen or net gives you a safe place to hit that won’t damage your space.
- A hitting mat is what you’ll hit off of, so choosing a durable option matters.
- A projector is optional for basic setups but necessary if you want to project simulator software onto an impact screen. If you choose not to use a projector, make sure you’re comfortable looking at a separate screen for feedback.
- Accessories like club holders and laptop stands can make your setup easier to use.
- Regardless of how advanced you’d like your setup to be, you can find everything you need to build your own golf simulator at PGA TOUR Superstore.
Start by Planning Your Simulator Space
Before buying a launch monitor or picking out an enclosure, start by selecting the room your simulator will be in. The space you have available will determine what kind of simulator you can build and which equipment will work best.
Start by measuring the room's height, width and depth. You need enough room to swing comfortably, but you also need space for the hitting mat, launch monitor, screen or net and, if you are using one, a projector. Don’t forget to take a few practice swings with your driver before committing to a space. A room can seem large enough on paper and still feel tight once you’re standing over the ball.
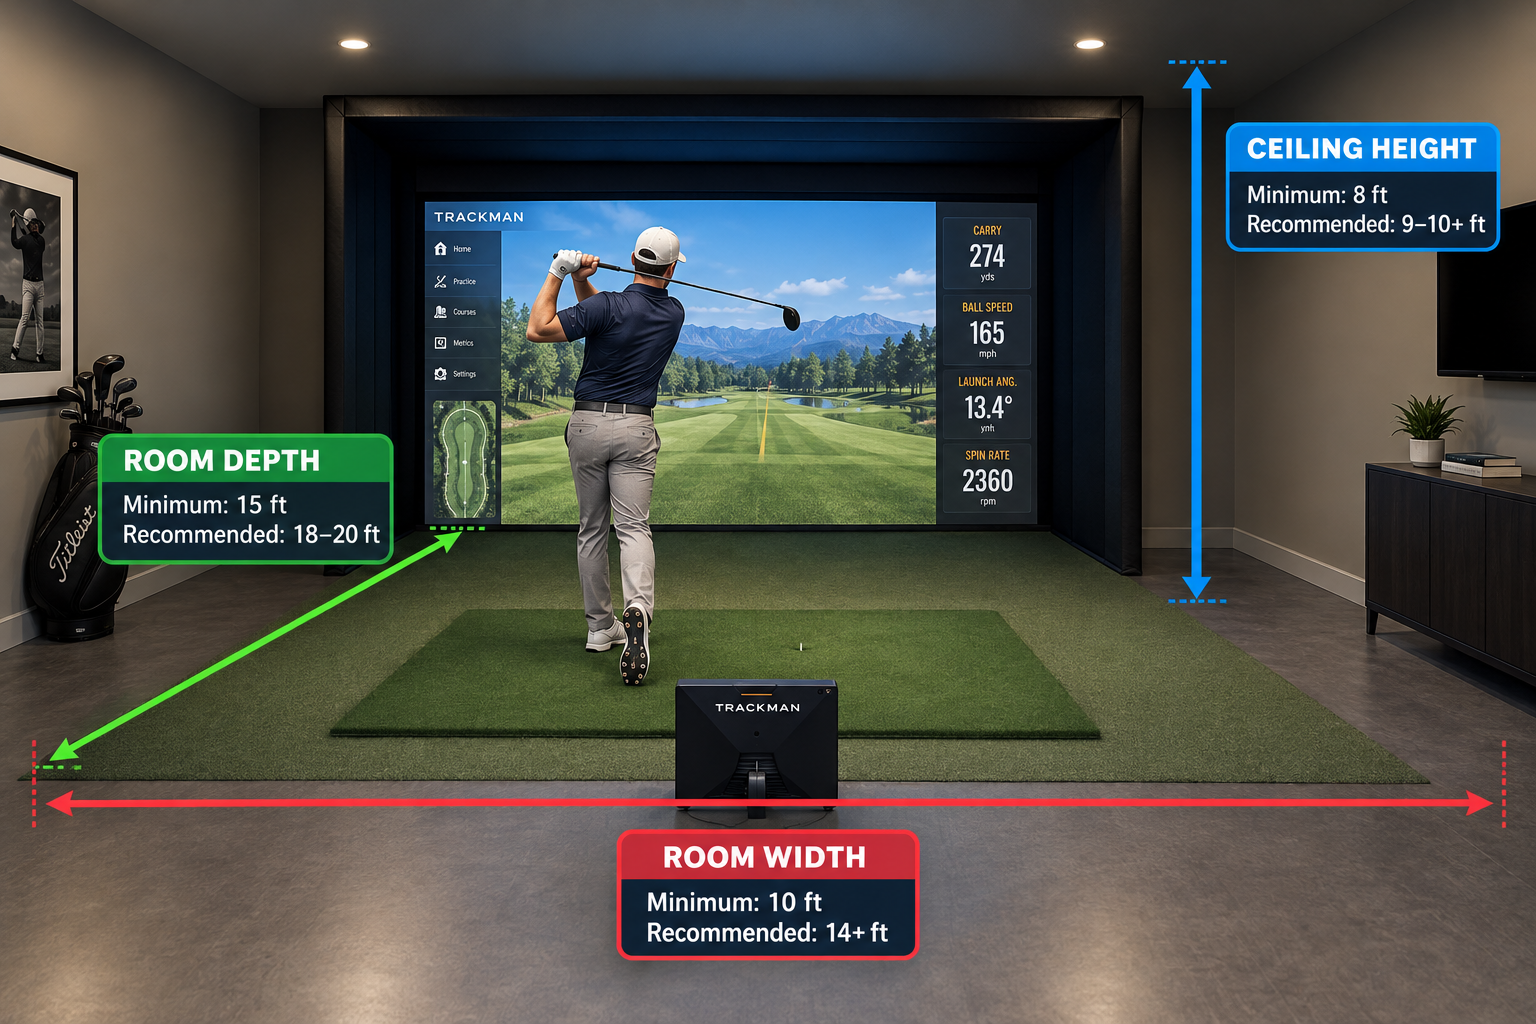
Recommended Golf Simulator Room Sizing Requirements

Ceiling height is particularly important when building your at-home golf simulator. An 8- or 9-foot ceiling can provide enough clearance for wedges and irons, but taller ceilings are recommended if you want to comfortably hit every club in your bag. For longer clubs like a driver, 10-foot or higher ceilings can provide the additional clearance needed for a full swing and prevents the need to alter your swing to avoid the ceiling. Taller players or golfers with a steep swing may need even more clearance. If the ceiling in your space is lower, be sure to test your full swing with every type of club before buying a permanent setup.
Garages, Basements, and Spare Bedrooms Are Great Spaces For Your Golf Simulator
We like to recommend starting with your garage, basement, or a spare bedroom when measuring your space. Garages offer plenty of room for larger setups but often lack air conditioning, which can make for uncomfortable practice sessions in warmer months. Basements can provide a comfortable environment but may have low beams or ductwork that limit your swing. Spare bedrooms can also work well for smaller setups, provided there is enough room to swing.
Lighting matters, too. If you plan on using a projector, too many windows or harsh lighting near the screen can make it harder to see. You’ll also want reliable access to power and, depending on your simulator software, a strong internet connection.
Most importantly, measure first and shop second. Knowing your room dimensions will make it much easier to narrow down your options.
Everything You Need to Build a Golf Simulator at Home
There isn’t a one size fits all solution for a great home golf simulator. The right setup is the one that gives you the experience you want without adding equipment you don’t need.
At the center of any setup is a launch monitor. From there, you’ll need a hitting surface and somewhere safe for the ball to go. A net can handle that job if you’re on a budget, while an enclosure and impact screen can turn the space into a full virtual experience.
If you’re using a net you won’t need a projector, but a setup with an impact screen will. If you don’t already have one, you’ll also need a computer or other compatible smart device to bring your simulator to life with the right software. Lastly, smaller accessories like a club holder, golf ball tray, and laptop stand can add the finishing touch.
Launch Monitors
The launch monitor is the heart of your golf simulator. It tracks what happens when you hit the ball and turns that information into the numbers, visuals and feedback you see on your screen.
Depending on the model, a launch monitor can provide information like ball speed, launch angle, spin, carry distance and total distance. More advanced models can provide additional club and ball data for golfers who want to really analyze their swing.
Software is another consideration. Check which simulator programs, courses and practice features are compatible with your launch monitor, as well as whether any subscriptions are required.
You’ll also need to consider where the launch monitor will sit. Some models are meant to be placed beside the ball, while others sit behind your hitting mat or mount overhead. That difference can have a major impact on how much space you need.



Netting, Screens, and Enclosures
Once you know which launch monitor you want, you’ll need to decide what you are going to hit into.
If you’re on a budget or want something simple, a hitting net may be all you need. Nets are generally easier to set up and take up less space. Pair one with a launch monitor, hitting mat, and smart device, and you’ve got a functional indoor practice setup.
If you want a complete virtual experience, you’ll need an impact screen. The screen gives your projector a surface to display the course while also stopping the ball.
An enclosure surrounds the screen and prevents slices or mishits from damaging your room. It also helps the simulator feel more like a dedicated room rather than a collection of equipment in the corner of your garage or basement.
When choosing an enclosure or screen, pay close attention to its dimensions. You need enough width for your swing and enough depth to comfortably position yourself between the hitting area and screen. If you think multiple people may use your simulator, try to take into account different heights and handedness when thinking about exactly where to position your screen and its distance from the hitting mat.


Hitting Mats
You’ll be hitting from your mat on every shot, so it’s worth choosing one that feels comfortable and is designed to hold up well over time.
A good mat should give you enough room to stand and swing comfortably while replicating the feel of grass or turf under your feet and club.
Some mats also include replaceable hitting inserts. These can be useful because the hitting area will naturally receive more wear than the rest of the mat.
You may also want to incorporate putting turf into your setup if your launch monitor and simulator software support putting. A larger turf area can make the simulator more versatile, but it’s not necessary if your main goal is practicing driving.
If you are trying to stick to a budget, don’t assume that every piece of your simulator needs to be premium. With options ranging from around $80 to more than $800, just remember that your mat will impact every swing you take, so it may be worth choosing a quality option.
-
Carl's Place-$765.90$1,259.95
-
-


Projectors, Computers, and Accessories
Note: If you're setup does not include an impact screen, you do not need a projector.
Completing your setup with the right projector and accessories brings everything together and makes your simulator easier to use.
When selecting a projector, consider screen size, room lighting, and throw distance (the distance between the projector and screen). Short-throw projectors are preferred because they can create a large image from a short distance. Mounting your projector to the ceiling is helpful if you don’t intend on moving your setup, but floor enclosures are another option that let you keep the projector near the screen without needing to wire your projector to the ceiling.
You’ll also need a device to run your simulator software, so it’s important to check the system requirements before buying. A laptop or tablet may work for basic setups, but more advanced software may require a more powerful computer. Trying to run software with a device that doesn't meet your software’s minimum requirements can result in slow load times, low-quality graphics, low frame rates, or the inability to launch the software at all.
Smaller accessories can help make your simulator more convenient to use. Keep extra golf balls nearby with a ball tray, stay organized with a dedicated club holder, and consider a laptop stand to keep your device within reach and at a comfortable viewing angle.
-
-
-
Carl's Place$315.90


Simplify Your Setup with a Golf Simulator Bundle
Building a simulator yourself gives you the freedom to choose every component, but it also means making sure all those components work together. If you’d rather skip some of that research, a simulator bundle can make the process easier.
PGA TOUR Superstore offers simulator bundles with technology and without technology that give you everything you need to get started. Depending on the package, that can include a launch monitor, enclosure, impact screen, hitting mat, projector and other equipment.
Bundles generally cost more than sourcing individual components yourself, but convenience is part of the value bundles provide. You won’t have to spend time figuring out which screen works with which enclosure or whether a certain projector will work with your setup, because our golf experts have already done that for you.
A bundle is a great option if you know you want a complete simulator and would rather spend your time playing rather than building.
Test the Latest Simulator Technology with One of Our Golf Simulator Showrooms
Still not sure which golf simulator is right for you? Visit a participating PGA TOUR Superstore to try the latest simulator technology in a Golf Simulator Showroom. Compare launch monitors, screens, projectors and more from leading brands like SkyTrak and Trackman, plus get expert advice based on your space, budget and goals.
Golf Simulator Showrooms are completely free to use and do not require an appointment.
Find Everything You Need to Build Your Home Golf Simulator at PGA TOUR Superstore
The best golf simulator isn’t necessarily the most expensive one. It’s the one that fits your space, budget and goals. Whether you’re looking for a simple setup to practice your swing or a fully immersive experience, there are options to match how you play.
It’s important to remember that when shopping for simulators, price is often a reflection of the technology and features included. A $25,000 simulator may offer more advanced tracking, graphics and features than a $3,000 DIY setup, but that doesn’t mean it’s the better choice for you. A more affordable setup may be exactly what you need to practice, while a premium system may be worth the investment if you want a more complete experience.
PGA TOUR Superstore has options for different budgets, spaces and playstyles. You can shop launch monitors, enclosures, screens and nets, hitting mats, projectors and accessories separately, or explore simulator bundles if you want a complete solution.